Proxmark3
From Fixme.ch
Information
- http://www.proxmark.org/proxmark
- http://code.google.com/p/proxmark3/wiki/Compiling
- DIY hf antenna
- https://www.brmlab.cz/project/freakcard
Proxmark 3 client
- Build the client/bootloader:
sudo apt-get install build-essential libreadline5 libreadline-dev libusb-0.1-4 libusb-dev libqt4-dev perl pkg-config
cd /tmp
wget http://sourceforge.net/p/devkitpro/perlupdaters/ci/master/tree/devkitARMupdate.pl?format=raw -o devkit.pl
chmod devkit.pl
./devkit.pl
export DEVKITPRO=~/devkitPro
export DEVKITARM=${DEVKITPRO}/devkitARM
export PATH=$DEVKITARM/bin/:${PATH}
svn co http://proxmark3.googlecode.com/svn/trunk proxmark3-read-only
cd proxmark3-read-only
make
- Plug the Proxmark
./client/proxmark3
- Use it as Mifare emulator, https://code.google.com/p/proxmark3/wiki/Mifare
Flash the Proxmark using a BusPirate
- Get OpenOCD and compile it for the BusPirate
git clone git://openocd.git.sourceforge.net/gitroot/openocd/openocd
cd openocd
./configure --enable-buspirate --enable-maintainer-mode --disable-werror --disable-shared
make && sudo make install
- Build the proxmark roms (bootrom and fullimage), see above
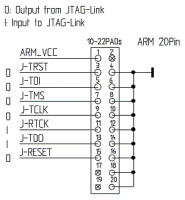
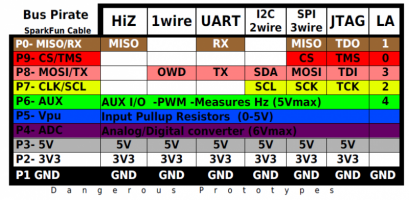
- Wire the BusPirate to the Proxmark3
- Pin 20 is GND and the the closest to the center of the board
- Connect GND, TDO, TMS, TDI, TCK using these pinouts, respectively p3 and buspirate
- Connect to the bus pirate
wget https://raw.githubusercontent.com/hewittc/proxmark3lcd/master/tools/at91sam7s512-buspirate.cfg
openocd -f at91sam7s512-buspirate.cfg
- Connect the p3 by USB
- Connect to openocd and flash
nc localhost 4444
> halt
> flash erase_sector 0 0 15
> flash erase_sector 1 0 15
> flash write_image /full/path/to/armsrc/obj/fullimage.elf
> flash write_image /full/path/to/bootrom/obj/bootrom.elf
- Wait and enjoy the P3
- References

