Difference between revisions of "Raspberry Pi"
(Created page with "Page showing some useful RPi information. Don't hesitate to contribute! Keep in mind that this is aimed at people who aren't necessarily competent with linux or electronics in ge...") |
m (Add link to verified SD Cards) |
||
| (12 intermediate revisions by 4 users not shown) | |||
| Line 2: | Line 2: | ||
== Setup == | == Setup == | ||
# Download [http://downloads.raspberrypi.org/NOOBS_lite_latest NOOBS], a simple to use installer that requires no command line knowledge | # Download [http://downloads.raspberrypi.org/NOOBS_lite_latest NOOBS], a simple to use installer that requires no command line knowledge | ||
| − | # Find an empty SD or microSD card (minimum 2gb/class 6, 4gb/class 10 recommended - try to find cards with UHS-1), make sure it's FAT32, and then extract all the files from the NOOBS zip onto it | + | # Find an empty [http://elinux.org/RPi_SD_cards SD or microSD] card (minimum 2gb/class 6, 4gb/class 10 recommended - try to find cards with UHS-1), make sure it's FAT32, and then extract all the files from the NOOBS zip onto it |
# Plug in the SD card, an HDMI or composite display, a ethernet cable, usb keyboard + mouse, and a ''good'' 5v power supply (seriously - a lot of issues come from low power/fake power supplies) [[File:RasperrySetup.jpg|500px]] | # Plug in the SD card, an HDMI or composite display, a ethernet cable, usb keyboard + mouse, and a ''good'' 5v power supply (seriously - a lot of issues come from low power/fake power supplies) [[File:RasperrySetup.jpg|500px]] | ||
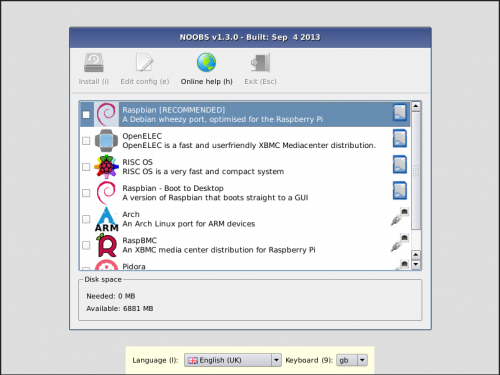
# Power on the Pi, and wait a few seconds until you reach the screen below. Select Raspbian, click install, and wait a few minutes - the Pi should take 20-60 minutes to install depending on your internet connection and SD card. [[File:NOOBS.png|500px]] | # Power on the Pi, and wait a few seconds until you reach the screen below. Select Raspbian, click install, and wait a few minutes - the Pi should take 20-60 minutes to install depending on your internet connection and SD card. [[File:NOOBS.png|500px]] | ||
| Line 14: | Line 14: | ||
# Click on finish, reboot your Pi, and you're good to go! | # Click on finish, reboot your Pi, and you're good to go! | ||
| + | |||
| + | <pre> | ||
Hackers guide, only do this if you know what you're doing - you could wipe the wrong device! | Hackers guide, only do this if you know what you're doing - you could wipe the wrong device! | ||
| Line 23: | Line 25: | ||
sync | sync | ||
##remove SD card and copy steps 3 and 5 above | ##remove SD card and copy steps 3 and 5 above | ||
| + | |||
| + | ## Configuration tool with menus / Outil de configuration par menu : | ||
| + | raspi-config | ||
| + | |||
| + | ## Ddefault user / Utilisateur par défaut : pi | ||
| + | |||
| + | </pre> | ||
| + | |||
=== WiFi === | === WiFi === | ||
If you have a WiFi stick that is directly compatible with Raspbian, follow the instructions bellow. If it's not, then you'll need to troubleshoot with Google. | If you have a WiFi stick that is directly compatible with Raspbian, follow the instructions bellow. If it's not, then you'll need to troubleshoot with Google. | ||
| + | |||
| + | [http://www.debuntu.org/how-to-wifi-roaming-with-wpa-supplicant/ WPA supplicant setup] with different settings for different networks | ||
| + | |||
| + | === Headless setup === | ||
| + | |||
| + | If you don't want to connect a keyboard and monitor to your RPi, you can perform a [[Raspberry Pi: Headless installation|headless installation of Raspbian]] instead of using NOOBS. | ||
| + | |||
| + | == Screen blanking == | ||
| + | add the following lines to /etc/xdg/lxsession/LXDE/autostart, remove the line with the screensaver option | ||
| + | |||
| + | @xset s off | ||
| + | @xset -dpms | ||
| + | @xset s noblank | ||
== Software == | == Software == | ||
| Line 32: | Line 55: | ||
Then you can edit files in /var/www/ | Then you can edit files in /var/www/ | ||
| + | === Wiki === | ||
| + | ==== Intro ==== | ||
| + | Utiliser un Raspberry Pi pour remplacer un serveur AMD 64 bit est ce réaliste pour héberger un wiki? | ||
| + | |||
| + | Lors de la sortie du modèle B+ en novembre je me suis lancé dans l'aventure d'installer un wikimedia sur le Raspberry Pi en ma possession . | ||
| + | |||
| + | ==== mediawiki ==== | ||
| + | |||
| + | Afin de minimiser l'utilisation des ressources et compte-tenu de mon besoin j'ai opté pour une installation avec sqllite3 . | ||
| + | |||
| + | Et si le wiki est visible il est d'une lenteur affligeante :-( voyez par vous même belorne . | ||
| + | |||
| + | La faute me semble-t-il à PHP et à la programation de mediadwiki qui est bien trop lourde pour une si petite machine. | ||
| + | |||
| + | |||
| + | Il faut oublier une telle idée, si ce n'est pour jouer . | ||
| + | |||
| + | ==== Une autre solution ==== | ||
| + | |||
| + | Oui biensur il y en a bcp mais pour une tel machine , la solution la plus ligth mais aussi la plus simple c'est MDwiki. | ||
| + | |||
| + | Un wiki en langage de description de page Markdown. | ||
| + | |||
| + | Je ne vais pas décrire les étapes de cette installation , juste vous donner des liens permettant de comprendre comment cela est faisable. | ||
| + | |||
| + | Les composants : | ||
| + | |||
| + | * Un rapsberry Pi B+ | ||
| + | * Os Raspbian 3.12.35+ | ||
| + | * Mdwiki [[http://dynalon.github.io/mdwiki/#!index.md Site]] | ||
| + | * 2 comptes Google Drive | ||
| + | * [[https://www.insynchq.com/ insync]] version RaspberryPi | ||
| + | |||
| + | Voici le [[http://boizot.ch/ résultats]] | ||
| + | |||
| + | Comment cela marche ? | ||
| + | |||
| + | Trés trés simplement. de mon portable je peux éditer n'importe quel fichier du site , en changer les liens.... | ||
| + | Le tout est quasi immédiatement mise à jour sur le dossier de mon Raspberry Pi qui est synchroniser en temps . | ||
| + | |||
| + | ==== Conclusion ==== | ||
| + | Biensur on est bien loin de Mediawiki ou de MoinsMoins. | ||
| + | |||
| + | Then you can edit files on your laptop. | ||
| + | |||
| + | === Push notifications === | ||
| + | You can send push notifications with Pushbulltet on various events, such as booting your Pi. Let's start off with a script that sends you a push notification with your IP when you turn on your Pi: | ||
| + | nano piip.sh | ||
| + | Paste this inside, and replace the example keys with your own keys: | ||
| + | #!/bin/bash | ||
| + | ipVar=$(/sbin/ifconfig eth0 | grep 'inet addr:' | cut -d: -f2 | awk '{ print $1}') | ||
| + | curl https://api.pushbullet.com/v2/pushes \ | ||
| + | -u <paste_your_API_key_here>: \ | ||
| + | -d device_iden="<device_ID_of_your_phone>" \ | ||
| + | -d type="note" \ | ||
| + | -d title="Pi IP address" \ | ||
| + | -d body=$ipVar \ | ||
| + | -X POST | ||
| + | |||
| + | Set permissions to allow it to execute: | ||
| + | sudo chmod 777 piip.sh | ||
| + | |||
| + | Open the crontab: | ||
| + | sudo crontab -e | ||
| + | |||
| + | Then paste at the bottom of the crontab: | ||
| + | @reboot /home/pi/piip.sh | ||
| + | |||
| + | [https://www.raspberrypi.org/forums/viewtopic.php?f=66&t=79151 Documentation] | ||
== Hardware == | == Hardware == | ||
| Line 45: | Line 137: | ||
Use the pin | Use the pin | ||
gpio -g write 13 1 | gpio -g write 13 1 | ||
| + | |||
| + | [https://projects.drogon.net/raspberry-pi/wiringpi/the-gpio-utility/ Documentation] | ||
| + | |||
| + | [https://github.com/sarfata/pi-blaster PWM library] | ||
Latest revision as of 16:31, 1 October 2016
Page showing some useful RPi information. Don't hesitate to contribute! Keep in mind that this is aimed at people who aren't necessarily competent with linux or electronics in general.
Contents
Setup
- Download NOOBS, a simple to use installer that requires no command line knowledge
- Find an empty SD or microSD card (minimum 2gb/class 6, 4gb/class 10 recommended - try to find cards with UHS-1), make sure it's FAT32, and then extract all the files from the NOOBS zip onto it
- Plug in the SD card, an HDMI or composite display, a ethernet cable, usb keyboard + mouse, and a good 5v power supply (seriously - a lot of issues come from low power/fake power supplies)

- Power on the Pi, and wait a few seconds until you reach the screen below. Select Raspbian, click install, and wait a few minutes - the Pi should take 20-60 minutes to install depending on your internet connection and SD card.
- After installation is complete, the 'Raspberry Pi Software Configuration Tool' pop up. You can skip this step but it's recommended that you change the following:
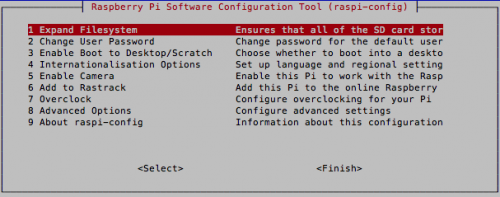
- Change User Password to something that you can remember - default one is raspbian
- Enable boot to Desktop select whether you want to boot to console (ideal for servers and remote access), or desktop (for projects that display something, or if you want to set up the pi directly on itself)
- Internationalisation Options
- Change locale to en_US.UTF-8 for everything, other options will break things later
- Change keyboard layout to German Switzerland -> Swiss French, this part is a must if you're used to fr_ch keyboards
- Advanced Options -> Hostname to something easy to find, such as 'raspberrypi-yourname'
- Click on finish, reboot your Pi, and you're good to go!


  Hackers guide, only do this if you know what you're doing - you could wipe the wrong device!

  wget http://downloads.raspberrypi.org/raspbian_latest && unzip raspbian_latest
  umount /dev/sdd1
  dd bs=4M if=2015-02-16-raspbian-wheezy.img of=/dev/sdd
  ##progress won't be evident, run 'pkill -USR1 -n -x dd' in another window to see it
  sync
  ##remove SD card and copy steps 3 and 5 above

  ## Configuration tool with menus / Outil de configuration par menu :
  raspi-config

  ## Ddefault user / Utilisateur par défaut : pi
WiFi
If you have a WiFi stick that is directly compatible with Raspbian, follow the instructions bellow. If it's not, then you'll need to troubleshoot with Google.
WPA supplicant setup with different settings for different networks
Headless setup
If you don't want to connect a keyboard and monitor to your RPi, you can perform a headless installation of Raspbian instead of using NOOBS.
Screen blanking
add the following lines to /etc/xdg/lxsession/LXDE/autostart, remove the line with the screensaver option
 @xset s off
 @xset -dpms
 @xset s noblank
Software
Web server (Apache)
sudo apt-get install apache2
Then you can edit files in /var/www/
Wiki
Intro
Utiliser un Raspberry Pi pour remplacer un serveur AMD 64 bit est ce réaliste pour héberger un wiki?
Lors de la sortie du modèle B+ en novembre je me suis lancé dans l'aventure d'installer un wikimedia sur le Raspberry Pi en ma possession .
mediawiki
Afin de minimiser l'utilisation des ressources et compte-tenu de mon besoin j'ai opté pour une installation avec sqllite3 .
Et si le wiki est visible il est d'une lenteur affligeante :-( voyez par vous même belorne .
La faute me semble-t-il à PHP et à la programation de mediadwiki qui est bien trop lourde pour une si petite machine.
Il faut oublier une telle idée, si ce n'est pour jouer .
Une autre solution
Oui biensur il y en a bcp mais pour une tel machine , la solution la plus ligth mais aussi la plus simple c'est MDwiki.
Un wiki en langage de description de page Markdown.
Je ne vais pas décrire les étapes de cette installation , juste vous donner des liens permettant de comprendre comment cela est faisable.
Les composants :
- Un rapsberry Pi B+
- Os Raspbian 3.12.35+
- Mdwiki [Site]
- 2 comptes Google Drive
- [insync] version RaspberryPi
Voici le [résultats]
Comment cela marche ?
Trés trés simplement. de mon portable je peux éditer n'importe quel fichier du site , en changer les liens.... Le tout est quasi immédiatement mise à jour sur le dossier de mon Raspberry Pi qui est synchroniser en temps .
Conclusion
Biensur on est bien loin de Mediawiki ou de MoinsMoins.
Then you can edit files on your laptop.
Push notifications
You can send push notifications with Pushbulltet on various events, such as booting your Pi. Let's start off with a script that sends you a push notification with your IP when you turn on your Pi:
nano piip.sh
Paste this inside, and replace the example keys with your own keys:
 #!/bin/bash
 ipVar=$(/sbin/ifconfig eth0 | grep 'inet addr:' | cut -d: -f2 | awk '{ print $1}')
 curl https://api.pushbullet.com/v2/pushes \
 -u <paste_your_API_key_here>: \
 -d device_iden="<device_ID_of_your_phone>" \
 -d type="note" \
 -d title="Pi IP address" \
 -d body=$ipVar \
 -X POST
Set permissions to allow it to execute:
sudo chmod 777 piip.sh
Open the crontab:
sudo crontab -e
Then paste at the bottom of the crontab:
@reboot /home/pi/piip.sh
Hardware
GPIO
 git clone git://git.drogon.net/wiringPi
 cd wiringPi/
 ./build
Then set a pin to output
 gpio [-g] mode <pin> in/out/pwm/up/down/tri
 gpio -g mode 13 out  #for example
Use the pin
gpio -g write 13 1