NodeMcu is a great higher level interface and easier to use than the default one.
http://hackaday.com/2015/03/18/how-to-directly-program-an-inexpensive-esp8266-wifi-module/
Flashing
How to talk to your RPi (and wiring) [1]
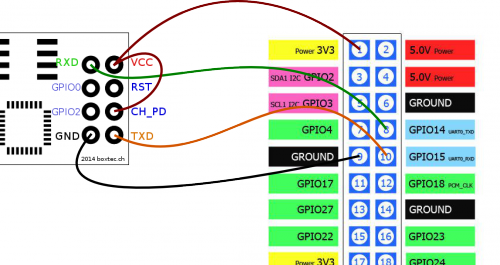
You need get esptool and wire your Pi like so (if it doesn't work, connect ESP's GPIO2 to it's VCC as well):
 pi@raspberrypi ~ $ sudo python esptool/esptool.py --port /dev/ttyAMA0 write_flash 0x000000 nodemcu_latest.bin
 Connecting...
 Erasing flash...
 Writing at 0x00062000... (100 %)

 Leaving...
Uploading code via CLI
Although there are tools like ESPlorer and others that require running a GUI on a local (windows) machine, using the CLI is easier. Luaupload is a CLI tool that uploads code without having to copy it over line by line via serial. If you want your code to run when booting the ESP8266, it must be called init.lua
 sudo pip install click pyserial
 git clone https://github.com/ArchimedesPi/esp8266-luaupload.git
 cd esp8266-luaupload/
 python luaupload.py upload -p /dev/ttyAMA0 -b 9600 ~/path_to_your_init.lua_file
Using the GPIOs
On the ESP-01 there are only 2 usable GPIOs. Other ESP's have more (ESP-12 has 10 GPIOs for example). You can use them for pwm, i2c, spi, 1-wire, gpio, adc, and uart with nodemcu. Please note that nodemcu maps the GPIO pins differently, refer to this index.
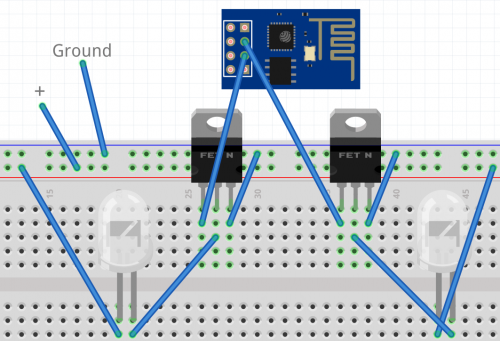
There are quite a few examples of how to use the ESP on the nodemcu page, to be able to control LEDs or relays over wifi, you'll need to connect it to wifi, set up a telnet server (hint: load it as a init.lua script), and then manipulate the GPIOs.


