Raspberry Pi
From Fixme.ch
Revision as of 09:53, 18 March 2015 by Sasha (Talk | contribs) (Created page with "Page showing some useful RPi information. Don't hesitate to contribute! Keep in mind that this is aimed at people who aren't necessarily competent with linux or electronics in ge...")
Page showing some useful RPi information. Don't hesitate to contribute! Keep in mind that this is aimed at people who aren't necessarily competent with linux or electronics in general.
Setup
- Download NOOBS, a simple to use installer that requires no command line knowledge
- Find an empty SD or microSD card (minimum 2gb/class 6, 4gb/class 10 recommended - try to find cards with UHS-1), make sure it's FAT32, and then extract all the files from the NOOBS zip onto it
- Plug in the SD card, an HDMI or composite display, a ethernet cable, usb keyboard + mouse, and a good 5v power supply (seriously - a lot of issues come from low power/fake power supplies)

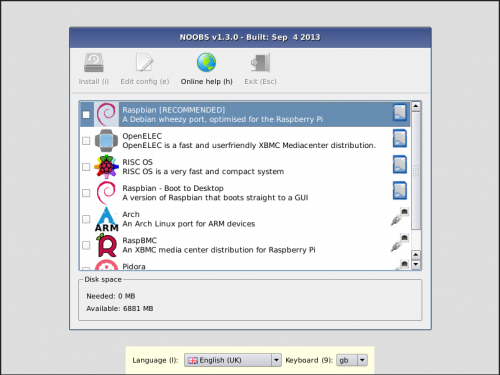
- Power on the Pi, and wait a few seconds until you reach the screen below. Select Raspbian, click install, and wait a few minutes - the Pi should take 20-60 minutes to install depending on your internet connection and SD card.
- After installation is complete, the 'Raspberry Pi Software Configuration Tool' pop up. You can skip this step but it's recommended that you change the following:
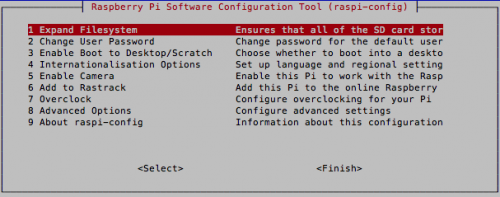
- Change User Password to something that you can remember - default one is raspbian
- Enable boot to Desktop select whether you want to boot to console (ideal for servers and remote access), or desktop (for projects that display something, or if you want to set up the pi directly on itself)
- Internationalisation Options
- Change locale to en_US.UTF-8 for everything, other options will break things later
- Change keyboard layout to German Switzerland -> Swiss French, this part is a must if you're used to fr_ch keyboards
- Advanced Options -> Hostname to something easy to find, such as 'raspberrypi-yourname'
- Click on finish, reboot your Pi, and you're good to go!


 Hackers guide, only do this if you know what you're doing - you could wipe the wrong device!

 wget http://downloads.raspberrypi.org/raspbian_latest && unzip raspbian_latest
 umount /dev/sdd1
 dd bs=4M if=2015-02-16-raspbian-wheezy.img of=/dev/sdd
 ##progress won't be evident, run 'pkill -USR1 -n -x dd' in another window to see it
 sync
 ##remove SD card and copy steps 3 and 5 above
WiFi
If you have a WiFi stick that is directly compatible with Raspbian, follow the instructions bellow. If it's not, then you'll need to troubleshoot with Google.
Software
Web server (Apache)
sudo apt-get install apache2
Then you can edit files in /var/www/
Hardware
GPIO
 git clone git://git.drogon.net/wiringPi
 cd wiringPi/
 ./build
Then set a pin to output
 gpio [-g] mode <pin> in/out/pwm/up/down/tri
 gpio -g mode 13 out  #for example
Use the pin
gpio -g write 13 1